(Click the up-arrow at the top of the page at any point, to get back to the table of contents here.)
✻
✻
✻
Getting started
First, if you haven’t already, see the WordsFlow download section to download and install the correct version for your InDesign major version, then come back here.
Make sure you’re using a recent InDesign and know the basics of story placing and linking in InDesign. You should also be familiar with importing Word documents (style mapping, etc.) or importing Excel spreadsheets. WordsFlow doesn’t change anything about the basics.
The good news is that, at its heart, using WordsFlow is quite simple.
You place Word and Excel files with WordsFlow, resulting in linked files that you manage normally with the Links panel.
When a linked file is modified, you can merge in any changes by updating the link, just as you would for a changed graphic.
When using with Word files, you can also update the linked document itself from the InDesign story, or export-and-auto-link a story to a new document.
That’s basically it, but here are more specifics, still at a fairly high level.
Use File > WordsFlow > Place with WordsFlow… to place text or spreadsheet files. WordsFlow will bring up the standard InDesign Place… dialog for you to select a file. Once placed, InDesign creates a special WordsFlow link to the placed file, which shows up as a normal-looking link in the Links panel.
When InDesign notices the linked file has changed (e.g., if you switch back to InDesign after editing in Word, or someone edits a shared file), it will display a “changed,” “out of date” warning icon for the link in the Links panel, as shown here. When you’re ready, you can merge-update the linked story from the changed file with a double-click on the link’s changed icon.
It’s perhaps a bit confusing that WordsFlow’s critical merge-update feature has no explicit user interface of its own, but, rather, works behind the scenes of normal link updating in InDesign. But we figure this way, it’s one less thing for you to learn and remember.
After each merge-update, you should check for conflicts using the Notes panel. Show notes with the show/hide note button on the panel bottom (highlighted here as showing), and move among them with the next/previous note buttons. Conflict notes have author “WordsFlow”.
While you’re reviewing and resolving or ignoring any conflicts, you can use the delete note (trash can) button on the panel for each note as you go, or use the Notes panel > Remove Notes from Story to remove them all when done.
See the section on handling conflicts for details on how conflicts are detected and which ones can be automatically resolved and which ones can’t.
To edit the external document, select the story’s link in the Links panel, and click the edit original (pencil) icon at the bottom of the panel (see above). When you return to InDesign, any external document changes will be automatically merge-updated into the story.
For two-way workflow, WordsFlow also supports updating a linked document in place from its linked story. Use File > WordsFlow > Update Linked Document with a linked story selected, to export the current contents back to the linked external document.
WordsFlow can also export a story to a newly-created and automatically-linked Word document. Use File > WordsFlow > Export with WordsFlow… with the story selected in either selection tool mode or type tool mode.
That should get you started. The rest of this user guide is a detailed reference to all the features of WordsFlow.
Also see Training for a great course covering both WordsFlow and DocsFlow operation.
✻
✻
✻
General operation
WordsFlow adds its own File > WordsFlow sub-menu, as seen here.
You’ll find some of its major functions in this menu, such as placing with (or without) WordsFlow-enabled linking, and updating and exporting stories as part of its two-way workflow with Word files.
However, WordsFlow’s update-merging functions are driven using InDesign’s standard link-updating machinery, rather than being available in this menu. I.e., instead of introducing a WordsFlow-specific user interface for these functions, we designed them to work using the tools you already know, so there are fewer things to learn.
The WordsFlow menu also has minor but helpful entries for visiting this user guide, the main product page, or product news in your browser, sending an email to support (with version information filled in), and for showing the WordsFlow version and license information.
Configuring keyboard shortcuts
If you’re a keyboard shortcuts user, assign a memorable shortcut to the File > WordsFlow > Place with WordsFlow… menu item, as we’re we’re doing here in the Edit > Keyboard Shortcuts… dialog (click to zoom).
Similarly, if you need place without WordsFlow frequently, you could choose some other shortcut for the Place without WordsFlow… menu item.
In the same vein, if you frequently use the two-way workflow menu WordsFlow > Update Linked Document or Export with WordsFlow…, you could assign a keyboard shortcut for either or both.
✻
✻
✻
Placing files
WordsFlow has two placement choices: Place with WordsFlow… and Place without WordsFlow…
Both of these selections lead to a normal File > Place… dialog, but with WordsFlow-enabled file linking turned on in the first case, and turned off in the second.
(Note that WordsFlow wasn’t designed to work in the presence of both WordsFlow-enabled text file links and non-WordsFlow-enabled text file links. When it’s is installed, any text links present are managed by WordsFlow. Thus, WordsFlow > Place without WordsFlow… never produces a link.)
WordsFlow will work with any text document format you can place into a story (the most common being Microsoft Word and Excel). However, WordsFlow’s updating of—and exporting to–external text documents only works with the more modern formats: Word (.docx extension) and Open Document Format (.odf).
Any WordsFlow-controlled story frame displays a little “wf” icon next to the link icon (or the link-modified alert icon) on the frame, which turns to a “wf+” icon if the story has been modified in InDesign since it was last placed or updated.
Style mapping
Although WordsFlow itself doesn’t do any style mapping, since it’s not a filter, you can bring up InDesign’s standard style mapping options for a Word document when you place it: check the Show Import Options checkbox, then select Custom Style Mapping and set up any maps.
Using WordsFlow for default and drag-and-drop placement
You can also elect to use WordsFlow by default, when using the normal File > Place… dialog or when using file drag-and-drop placement.
To do this, with no document open (so it’s a global default), turn on Preferences > File Handling > Create Links When Placing Text and Spreadsheet Files, which will leave it on for all documents you create in the future.
If you would like to use WordsFlow by default only when placing in an existing document, turn that preference on with the document open.
Not using WordsFlow for a particular placement
If you have WordsFlow turned on by default, or are simply not sure, and would like to place without involving any WordsFlow linking machinery, simply use File > WordsFlow > Place without WordsFlow… and proceed with normal placement.
✻
✻
✻
Managing linked stories
Once a file has been placed with WordsFlow, it works within InDesign’s existing file linking and updating user interface machinery. You use the Links panel functions as you would for graphic files, but now WordsFlow enables the same update, relink, edit original, etc. functionality for text and spreadsheet files.
When a link is updated or re-linked, WordsFlow performs a merge-update, intelligently weaving the source file changes into the current story without losing any of your work.
✻
✻
✻
Update-merging from changed files
When an external WordsFlow-linked file is changed, InDesign will notice and display a yellow warning-sign “link-changed” icon in the Links panel, as shown here in the selected Tale of Two Cities.docx link.
If frames edges are being shown, InDesign will also show the yellow link-changed icon in place of the link icon in the upper left of each frame in the story, as shown earlier in the wf icon description.
As with most InDesign features, there are several built-in ways to invoke a link update (which gets handled as a merge-update for any WordsFlow-managed link):
The simplest is to double-click on the yellow link-changed icon, whether in the Links panel, or on the story frame itself.
With the link to be updated selected in the Links panel, click on the update link (chasing arrow) button at the panel bottom. (Option/control-clicking on the button updates all links.)
With the link to be updated selected in the Links panel, select Update Link from the panel menu, or Update All Links to update every link that’s changed (see menu above).
Control/right-click on the link entry in the Links panel, and choose Update Link from the contextual menu.
Note that, under Windows only, if you have the Word or Excel file open (or anyone has it open on a network share), then link updating is disabled by InDesign itself—we don’t control this.
✻
✻
✻
Resolving conflicts
After each merge-update, you should check for conflicts in the updated story using the Notes panel, and clear out (delete) any conflict notes, after review.
With the updated story selected, notes can be made visible with View > Extras > Show Notes, or by using the Notes panel’s show/hide notes button, highlighted as “showing,” here.
You can move among the notes with the previous/next note (left and right arrow) buttons in the Notes panel, or just select a note individually in the story.
Review each note to see what the conflict was, and decide how you would like to handle it.
Once you’ve reviewed the current note, delete it using the Notes panel’s delete note (trash can) button or the panel menu’s Delete Note.
Or, once you’ve reviewed everything, delete all notes from the current story with the Notes panel menu > Remove Notes from Story, as shown here. (But only use this if there are only conflict notes in the story, and not notes you’re using for other purposes.)
Tips
If you enable the # of notes column in your Links panel, you can see how many notes are in your story at a glance.
Using the story editor may be easier than working with notes in the formatted text.
✻
✻
✻
Re-linking and updating
If you save, or someone sends you, an updated external document under a new name (so the link is no longer valid), you can select the original link, choose Relink… from the Links panel menu, and then select the new file.
InDesign will re-link the story to the newly-selected file, and WordsFlow will merge-update the story contents with the newly-re-linked external document contents.
You have the option of re-mapping Microsoft Word styles to InDesign styles using the Import Options dialog, if someone has changed some of the document style names in an external Word file.
✻
✻
✻
Editing external documents
You can open and edit the linked external document using any of the standard InDesign methods:
Edit > Edit Original with the linked story selected for editing;
the Edit Original (pencil) button in the Links panel, with the linked story selected in the panel;
the Links panel menu’s > Edit Original, under the same condition;
the link contextual (control/right-click) menu’s Edit Original.
When you return from editing a linked story, if the external document has been changed, InDesign (with WordsFlow working behind the scenes) will automatically merge-update the changes into the story.
You can also visit or edit the linked external document after updating it with WordsFlow, as detailed in the next section.
✻
✻
✻
Updating external documents
As part of its two-way workflow machinery, WordsFlow enables File > WordsFlow > Update Linked Document when in type tool mode with a selected linked story, when the linked story’s contents have changed since the last place or linked-document update. Invoking this will export the story to the linked external document, replacing its contents.
You can also use Update Linked Document and Visit and Update Linked Document and Edit from the Edit >WordsFlow menu, the WordsFlow sub-menu on the story’s control/right-click contextual menu (as shown here), the Links panel’s menu, or a link in the Links panel’s control/right-click contextual menu.
Any of these will update the linked external document and then open the resulting document in the appropriate editor (like Edit Original), but only the second (and Edit) will auto-merge-update the link if the external file is changed when you return to InDesign.
For a story export to formats that support it (such as Word .docx, .odt, etc.), WordsFlow re-creates the InDesigns story’s formatting and content as closely as it can, including font usage, indents, margins, etc. But of course it can’t do a perfect job, since there are no perfect mappings between InDesign and Word document formats.
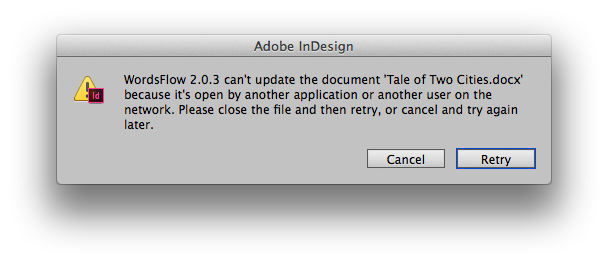
If the linked external document is already open for writing by some other application either locally or on the network (e.g., it’s being edited in Word or some other application), then WordsFlow will raise an alert and ask you what you would like to do.
You can either retry (after switching to the application where the file is open, and closing the file, or asking whomever has it open on the network to close it), or cancel the update.
If you select retry and WordsFlow finds the document has changed since it was last import-merged into InDesign, WordsFlow will alert you, and cancel the update. You can then update the link from the external document to merge in any changes (see above), and then you can finally update the linked document, which will then include all changes on both sides.
✻
✻
✻
Exporting to external documents
As part of its two-way workflow machinery with Word, WordsFlow provides an export capability.
Invoking File > WordsFlow > Export with WordsFlow…, with a story selected in selection tool mode or in type tool mode, will export it to a new document (in .docx format by default, called Microsoft Word 2007 in InDesign, but other formats are supported), and automatically link the newly-created document as if it had just been placed in the original story.
As with updating external documents, WordsFlow will create the new document to follow the formatting of the story contents as closely as possible given the limitations of the chosen document format.
If you don’t want a newly-exported story to be linked to the external file, you’ll have to unlink the story after export (see section Unlinking).
Or, you can use InDesign’s own File > Export… to invoke the export with no auto-link (for which WordsFlow provides both the .docx and .odt export filters).
✻
✻
✻
Unlinking
If you’re finished managing a linked file with WordsFlow, and want to make sure it can’t affect your InDesign document contents any further, select the link in the Links panel and choose Unlink from the panel menu.
Or, control/right-click on the link in the Links panel and choose Unlink from the pop-up contextual menu.
✻
✻
✻
Handling conflicts
Each time you update a story from a linked Word or Excel document file, WordsFlow (behind the scenes) performs a merge-update rather than simply letting InDesign replace the story contents.
WordsFlow looks at the previous state of the linked file (privately saved in the InDesign document) and the current state of the linked file, and computes the “difference” between the two, to get the current set of changes to be applied.
Then, WordsFlow applies those differences and updates the current InDesign story by merging in the differences.
When there are conflicts in this merge-update process, the external Word or Excel file always “wins” for content order and the InDesign story always “wins” for formatting.
For example, when updating an InDesign story from a Word document, if the same piece of text has been moved in both, then WordsFlow will let the Word document determine the location of the resulting piece of text in the merged InDesign story.
Similarly, if both have style changes to the same piece of text, then WordsFlow will let the InDesign story determine how the resulting piece of text is styled.
When there are content conflicts of the following kinds (formatting conflicts are never reported), WordsFlow will alert you by inserting a note (author “WordsFlow”) at the point of conflict:
insertions were made on both sides at the same point;
an insertion was made inside text that no longer exists on the other side;
content was moved on both sides in an incompatible way.
✻
✻
✻
Workflow patterns
(Below, we’ll use the term “author” for both author and editor, i.e., anyone who’s working with a source Word/Excel document.)
Using email/file-sharing sites
If you work by sending and receiving Word/Excel files from authors using email or file-sharing sites, then things would work best with WordsFlow by gathering all relevant files into a single folder for your current publication.
That way, when you’re sent a new version of a file you’ve already placed (via email or a new download from a file-sharing site), you can simply replace (copy over) the old version with the new, and InDesign will notice the change and allow you to merge-update with WordsFlow.
Or, if they’ve changed the file name in the new version (e.g., by appending a revision number), you can relink the story to the newest file (which will also trigger a merge-update).
Using filesystem-sharing solutions
Perhaps the best method for working with authors using Word/Excel files would be to use a filesystem-sharing solution like Dropbox, Box, Google Drive, Microsoft OneDrive, etc.
If you establish and share a new shared folder for each publication with the authors on your team, you can directly place files into InDesign from that folder, they can edit them in place, and when you see they’ve updated the file via the link status changing, you can merge-update immediately from InDesign.
Further, you can edit the shared file yourself if you need to make major edits, and those will be seen by everyone else on the team.
Of course, you may have to use some kind of email or messaging channel to alert each other what the state of a given file is; if someone’s actively editing for a while, you don’t want anyone else to edit it, nor do you want to merge-update the file in InDesign until they’re done with their current edits.
✻
✻
✻
Troubleshooting
Under Windows, if you have a valid WordsFlow link that you can’t update, try closing the linked file in other applications (including applications running elsewhere but sharing the same file on a server), if open. InDesign Windows won’t let you update a link that’s already open by another application (like Word or Excel).
See if any problems you’re seeing during initial placement happen without WordsFlow (e.g., try File > WordsFlow > Place without WordsFlow…), in which case it’s an Adobe issue. However, we’re glad to advise on how to report it.
If you’re seeing a crash or significant hang (some updates can take a while) on link update, you very likely have a corrupt document. There’s an easy way to clear that up:
open the current (potentially corrupt) document, and save it as .idml (InDesign XML format), then close it;
open the just-saved .idml document and save it immediately as .indd (normal InDesign document) then close it;
open the just-saved .indd document and try the update again.